Intro
L-systems were introduced and developed by Aristid Lindenmayer back in 1968 and are often used to produce fractals or images of flowers, as the repeating nature of some flowers is very easy to reproduce using L-systems. L-systems consist of four parts: variables, constants, Axiom, and rules. The rules describe how the axiom, or start expression, evolves from iteration to iteration.
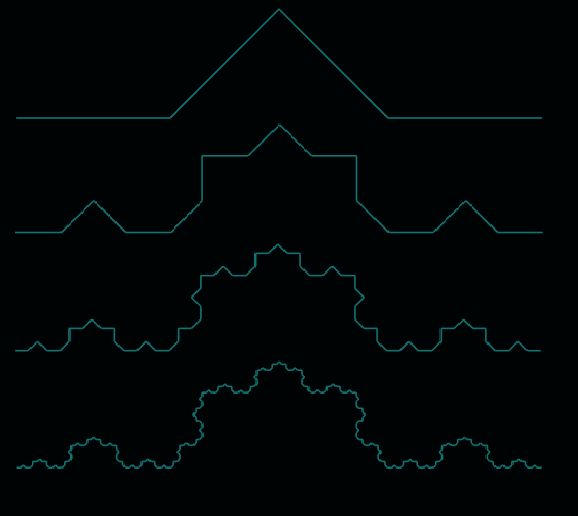
Let’s look at a classical example:
- Variables: L
- Constants: +, −
- Axiom: L
- Rules: L => L-L++L-L
How the different symbols are interpreted is entirely up to us, but in this example, we define:
- L to mean “draw line forward”
- + to mean “turn left”
- − to mean “turn right”
So the algorithm is a simple search and replace. We go through the axiom or start string L and replace it according to the rule, resulting in the following strings:
- Iteration 1: L => L-L++L-L
- Iteration 2: L-L++L-L => L-L++L-L-L-L++L-L++L-L++L-L-L-L++L-L
- Iteration 3: L-L++L-L-L-L++L-L++L-L++L-L-L-L++L-L => L-L++L-L-L-L++L-L++L-L++L-L-L-L …
and we can keep going for as many iterations as we like, but as we can already see, the resulting string grows very raptly because of the “long” rule for L. If the rule for L was simpler, the resulting string of cause wouldn’t grow as fast.
Repeatedly applying the rules increases structure and complexity.

But enough theory; If you want more information, you can read an in-depth explanation of L-systems on Wikipedia.
Implementing the L-system.
We’ll be use strings for variables, constants, and axiom, a StringBuilder for building up the result, and a simple Map<string, string> for the rule(s), defining the string to search for and what to replace it with.
First we define the RuleSet:
@Serializable
data class RuleSet(val rules: Map<String, String>, val axiom: String)
As simple as can be, simple data class containing the axiom and the Map containing the rules.
We need the annotation @Serializable as we will be reading the rules from a JSON file.
{
  "rules": {
    "L": "L-L++L-L"
  },
  "axiom": "L"
}
This is the simple rule for creating the image displayed above.
The simple constructor for the LSystem class is only taking a RuleSet as parameter:
class LSystem(private val ruleSet: RuleSet)
The generate function takes in the number of iterations to run and calls the generateExpression that number of time. It also times how long each generation takes in nanoseconds.
fun generate(iterations: Int) {
    expression.append(ruleSet.axiom)

    var startTime: Long
    var endTime: Long

    for (i in 0 until iterations) {
        startTime = System.nanoTime()
        expression = generateExpression(expression)

        endTime = System.nanoTime()
        println("Time to generate iteration ${i + 1}${endTime-startTime}ns - With a size of ${expression.length}")
    }
}
The generateExpression function is the heart of the L-System. It goes through the current expression character by character and tries to match up the rules with the upcoming characters using the matchesPattern helper function. When a match is found, the resulting string from the rule is appended to the new expression. If no match is found, the current character is appended to the new expression. This approach avoids the need for rules that don’t replace anything, such as “-” => “-“.
private fun generateExpression(expression: StringBuilder) : StringBuilder {
    val newExpression = StringBuilder()

    var position = 0
    while (position < expression.length) {
        var matched = false

        // Check each pattern in order
        for (pattern in ruleSet.rules) {
            if (position + pattern.key.length <= expression.length && // check we are not matching outside the expression
                matchesPattern(this.expression, position, pattern.key)
            ) {
                matched = true
                position += pattern.key.length // Move the position forward after matching
                newExpression.append(ruleSet.rules[pattern.key])
                break
            }
        }

        if (!matched) {
            newExpression.append(expression[position])
            position++ // Move to the next position if no pattern matched
        }
    }

    return newExpression
}
The helper function matchesPattern goes through the characters in the pattern and tries to match them with the next characters in the input StringBuilder. This is a greedy approach, so the order of the rules matters. For instance, if we have the two rules “-” => “L” and “–” => “L” in that order, the second rule will never be applied because the first rule always matches first. Therefore, place the longer rules first.
We could pre-sort the rules, but for this introduction, we just have to keep the order in mind.
  private fun matchesPattern(input: StringBuilder, position: Int, pattern: String): Boolean {
    for (index in pattern.indices) {
        if (input[position + index] != pattern[index]) {
            return false // Return false if any character doesn't match
        }
    }

    return true // Return true if all characters match
}
Implementing the Visualizer
So now we have a long string of characters, but we need to interpret in some way. This is where the visualizer comes in.
We started by defining the variables and constants –, +, and L, so now we just have to draw from the expression.
The Visualizer constructor takes a few parameters:
- expression, the expression to be interpreted
- imageSize, the size for the output image
- padding, the padding around the figure to the edge of the image, in pixels
- filename, the filename for the output file.
class Visualizer(
    private val expression: StringBuilder,
    private val imageSize: Vector2,
    private var padding: Float,
    private var filename: String
)
Let’s start with the rules and the drawing function doTurtleAction. But for that to make sense, we’ll also have to look at the SystemState data class.
data class SystemState(
    var position: Vector2,
    var angle: Float,
    var length: Float,
)

fun doTurtleAction(c: Char, state: SystemState, canvas: Canvas? = null, draw : Boolean = true) {
    when (c) {
        'L' -> drawLine(state, canvas, aPen, draw)
        '+' -> state.angle += 45
        '-' -> state.angle -= 45
    }
}
The SystemState class keeps track of the current position of the pen drawing the figure, the current angle in degrees, and the length. This can be extended to keep a stack of positions that can be pushed and popped so that when drawing, it can store a position, draw something, and return to that position. However, this isn’t implemented in this simple version.
In doTurtleAction, using Kotlin’s when function makes interpreting the character very straightforward. Here, we define what we want the different variables and constants to do. We use 45 degrees for + and – because this will create a nice Koch fractal, but you can set it to whatever you like. L draws a line based on the length and angle in state.
I added some extra steps in the Visualizer to help always output a nice image of the whole figure. That is, I go through the entire algorithm without drawing anything; I only log the minimum and maximum positions. This allows me to scale the lines to draw and set the starting position so the figure is centered and fills the given image size, excluding the padding.
Calculating the area of the figure with the line at size 1 is done using the calcArea function.
private fun calcArea(): Rectangle {
    val state = SystemState(
        angle = 0f,
        length = 1f,
        position = Vector2(0f, 0f)
    ) hosted

    expression.toString().forEach { c ->
        doTurtleAction(c, state, null,false)
        updateAreaData(state)
    }

    val x = floor(minXPosition)
    val y = floor(minYPosition)
    val w = ceil(maxXPosition) - x
    val h = ceil(maxYPosition) - y
    return Rectangle(x.toInt(), y.toInt(), w.toInt(), h.toInt())
}
When outputting the image, we start by getting the area and performing some calculations to get the scale and the starting point to use.
private fun outputAsImage(maxImageSize: Vector2, filename: String) {
    val area = calcArea()

    val xScale = (maxImageSize.x - padding) / area.width
    val yScale = (maxImageSize.y - padding) / area.height
    val scale = if (xScale < yScale) xScale else yScale

    val state = SystemState(
        angle = 0f,
        length = scale,
        posi hosted tion = Vector2(minXPosition * (-scale) + (padding / 2), minYPosition * (-scale) + (padding / 2))
    )
Now we setup the canvas to draw on. Here we use the Kotlin wrapper for the Skia 2d graphics library called skiko.
    val surface = Surface.makeRaster(ImageInfo.makeN32(maxImageSize.x.toInt(), maxImageSize.y.toInt(), ColorAlphaType.OPAQUE))

    // Get the canvas from the surface
    val canvas = surface.canvas
    // Clear the canvas with a white background
canvas.clear(Color.TRANSPARENT)Note: The Kotlin wrapper for Skia doesn’t use the same naming for classes and functions, which makes it challenging to use the documentation for Skia. After a lot of searching, I got it working, but without a deeper understanding of why, so I’m not sure if it’s the right way of using it. But it works.
Now we draw the figure and output the image to a file.
    expression.toString().forEach { c -> doTurtleAction(c, state, canvas) }

    // Get the snapshot of the surface
    val image = surface.makeImageSnapshot()

    // Encode the image as a PNG
    val data = image.encodeToData(EncodedImageFormat.PNG, 100)

    // Save the PNG to a file
    File("$filename.png").writeBytes(data!!.bytes)
}
That’s it!
I’ve added the full project code here, for free download.
Thoughts:
However, nothing says we must use repetitive rules; we can do whatever we want. We could alternate between differenthosted rules, shift rules when a specific pattern is seen, reverse parts based on other triggers, or use any approach that could yield an interesting result. I like to add randomness to the constants, so instead of turning exactly 90 degrees, we turn 90 degrees plus or minus some small random value to introduce variation. Create different weighted rules, allowing multiple rules for the same pattern with different probabilities! “Barney Codes” has already implemented this, as seen in YouTube video.